Home › Forums › General Discussions › Hi from a new Dickerson 37 owner
- This topic is empty.
-
AuthorPosts
-
March 9, 2015 at 11:32 am #354
 SienaParticipant
Hi!
We bought Siena (ex Blue Skye 1986 D37 tri cabin) last summer and enjoyed sailing her quite often around Hingham and Boston MA areas. I've sailed, cruised and raced extensively in my 37 years but my wife and 2 young kids are just getting into it. Lots of evening harbor cruises and weekend jaunts to the harbor islands.
This summer we plan to take her a little further afield. I'm fighting all urges to plan some cruise to a faraway place as I want to keep it fun and enjoyable. I hope with time and age I can get them to take longer cruises.
The boat was very kitted up as purchased so last summer was spent enjoying. The previous owner left her on the hard for 2 years and the exterior varnish suffered. In a moment of weakness I decided to tackle all the interior varnish, so I removed almost all the interior joinery and finished it in my garage this winter. It remains to be seen if I will get to the bulkheads etc this spring as the real focus needs to be toerail, bowsprit, dorade boxes etc.
Siena has been a great boat and we are enjoying every moment, very happy with her. I also spend quite a bit of time racing on vintage boats especially Halsey Herreshoffs NYYC 40 Rugosa.
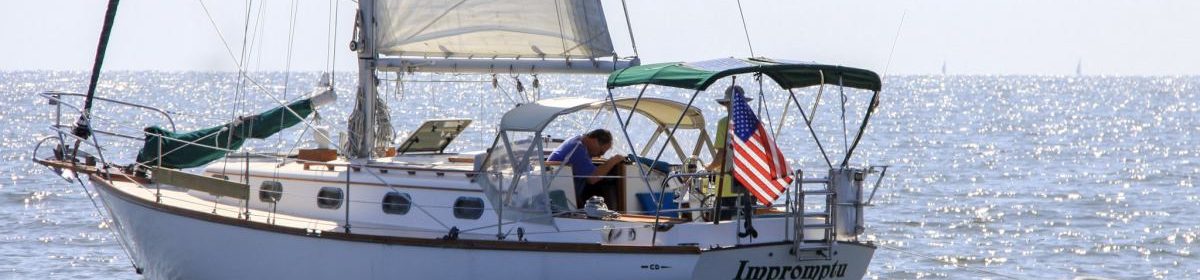
Here's a pic from the delivery during a stopover in Marion. I've since set up the dodger, lost the anchor ensign to be replaced by a proper ensign mounted on deck, removed the davits, removed the Bimini framing and generally got her looking sharp. The flag blue awl grip looked great until the set of the mooring ball beat up her forward top sides this summer so I try to not look at it haha.
Hope to see you on the water,
Peter
March 13, 2015 at 12:10 am #1184 Fleet CaptainKeymaster
Ahoy Peter,
Let me be the first to welcome you and your family to the larger family of Dickerson owners and enthusiasts. Congratulations on a great boat choice. As a fellow D37 owner, I contend that you could not have made a better one. We, in the Dickerson Owners Association are hard at work planning our 50th Anniversary Rendezvous in Oxford, MD for this June. We would hope that you can join us.
I will send you a personal email with details.
March 13, 2015 at 12:32 am #1185SienaParticipantThanks for the welcome!
I would love to make it down but it's probably not in the cards this year. We are planning a week or two having the boat stashed in Newport and maybe a trip to Maine (my home state) in the fall? I would like to plan a trip south for a winter and keep the boat near Florida as we have family and close friends in the del Ray beach area. If so the Chesapeake will def be in the list.
The dickerson has just been a wonderful boat, ours had some exceptional stewardship along the line. The gentlemen I purchased the boat from was not one of those stewards unfortunately but the lack of care was just cosmetic. The owner before undertook a massive refit, new westerbeke, max prop, simrad hydraulic autopilot, upholstery, Dickinson heater, A/C, new rig, awlgrip etc. what I'm fixing now is cosmetic. The interior was a solid 9/10 and with the freshly satin varnished interior and bright teak and holly sole should be a looker.
Just need to get after the exterior varnish this spring, if only there wasn't a 8' snow pile where I need to back my truck up to…
I am possibly in the market for some sails, mine have a season left in them. If anyone has a lead on some decent cruising sails I'd love to hear from them.
Thanks
Peter
Hingham, MA
March 17, 2015 at 12:50 pm #1186Mike AitkenParticipantHi Peter,
I'm a “Northern” neighbor….Central NH. We Kept our D-36 (IRIS) in Westport Massachusetts, near Cuttyhunk…. & hope this year to have the boat in Portsmouth NH. Cruise up to Maine……
I spent many years sailing out of Hingham (Lived there for years). Boston harbor, South Shore & North Shore is a great sailing area. Maine is a short trip away & Lots of “rock” to explore (but if you are from Maine, you know that). We love the Castine to Brunswick area…….Newport is fun…Make sure you get out to Block Island…. Can be crowded, but very nice!! Warm water!
Do you moor in Hingham Harbor, or on the Back river near Hewitts cove?
Welcome to the Dickerson Board!
MikeApril 4, 2015 at 10:23 pm #1187SienaParticipantThanks Mike for the welcome! We are at the Hingham shipyard.
All of a sudden things hit a fever pitch getting ready. I decided to remove the entire holding tank (aftermarket plastic) because previous owner had left it, uh, filled for 2 years and the looks from my wife were enough to start the process. It was a plastic 10 gal tank and the hoses were permeated. I removed the tank, drained it, cleaned it as best I could. I then filled it with ice and a strong concentrate of Purple Power, capped the ports and drove around with it in the bed of my truck for 3 weeks. Worked great.
Reinstalled with new Shields 101 sanitation hose. I got it at West Marine and they matched the best price I found online which they have been doing for me lately with varnish/paint vs Jamestown. Although I do end up buying a lot of stuff from Jamestown anyways. I hope the new hose and the fresh tank go a long way to cutting down on odors. I also plan to scrub the bilge.
On to fun stuff. Been meaning to reletter Siena and finally got on it. I race a lot on a NYYC40 and I was remarking to the skipper how nice and classy his letters looked. Turns out he does tem himself with a vinyl cutter so I set off for Bristol RI today and made use of his generosity.
Here's the old

I traced the transom and fortunately they have lots of lead ducks being naval architects and a batten. Here's a couple check for size plots

This was the final version

He has a cool old office in the Herreshoff building, lots of good old pics on the wall. And “stuff”

Some old Nat Herreshoff power boat hulls they were checking, there are a lot of hull models at the museum too.

So the top layer in gold was cut on the vinyl cutter

And then transferred to the white letters being careful to align everything with transfer tape

So all that is left is to remove the old letters with a heat gun and layout the new letters. I really like the bronze color he recommended. He had the flashy gold but I agreed that the bronze satin was a nicer look
Then I hit the sewing machine for some repairs. Let me just say I will never make a living as a seamstress or a sailmaker but I did a decent job sewing on some new Dacron for my UV cover. I thought the sails were in worse shape but they aren't really bad. I will have a sailmaker work on them this fall and make a decision about how to proceed.
 April 7, 2015 at 12:33 pm #1188Mike AitkenParticipant
I Like the “bronze” letters….An interesting, “classic” look……..
I used simple off white vinyl letters, but sanded them off during repairs & the boat needs new ones….. I'll have to look more closely at different colors.
……Nice job on the sewing machine!…..My wife had me doing the “button holes” on our sail covers a few years back …it was fun.
MikeApril 25, 2015 at 3:24 am #1189SienaParticipantOn coat 3 (or 4…) of the cabin sole. Finally got the right varnish (schooner96) and the ratio just right. I abandoned the epifanes varnish brush and went to a foam roller and foam brush for tipping off. Got a much more even coat by pouring the varnish on the sole panels, rolling out and then tipping off. Also switched to my old skool porter cable half sheet finish sander does a great job.

No pics but got the bottom painted, zincs on ready to hit the water in a week. Lots to do though, I think I was a little ambitious with my off season plans ha!
April 25, 2015 at 3:26 am #1190SienaParticipantOh and I also tried to apply the letters on a gusty day…yada yada yada..the new letters arrived today hehe
April 27, 2015 at 2:38 pm #1191SienaParticipantI worked a lot on the boat today it felt great to make some real progress.
Turned the main hatch cover from looking essentially like this

After a lot of sanding including a belt sander

This is with a very thinned first coat of varnish to seal the teak

Only 10 more coats to go

Finally got the name on, wish it was a little bigger (
 ) but I think it looks sharp.
Scrubbed the bilge, installed the batteries including make a new ground cable, installed the engine impeller, hooked up the hot water heater, did a ton of sanding and started getting the first coats of varnish on the exterior. Beat tired but got a lot done
May 7, 2015 at 3:11 pm #1192SienaParticipant***tap tap***
This thing on?
Anyone else working like a dog to get things moving in this beautiful weather we are having?Coat #2 on the exterior, needed a lot of work.


 May 12, 2015 at 8:34 pm #1193Fleet CaptainKeymaster
Hey,
We're here and admiring your great work. Keep the pictures coming. We're just so busy getting our own boats ready for the rendezvous, we have little time to respond……..Sorry…….Oh, and we are sailing, too (the pleasures of living where the weather suits our clothes).
May 13, 2015 at 11:13 am #1194SienaParticipantOh I know, just pulling on your rudders. I'm in the home stretch for this session of varnish. Next varnish project (which I can do at the mooring) is to tackle the handrails and some of the smaller bits around the cockpit. I also want to pull my lewmar hatches and rebed them. I've heard butyl tape vs caulk wondering what the common wisdom is here? My boat has teak surrounds that are cambered bonded down to the deck. The lewmar drops right down on those. I was thinking of sanding back into good color on the teak and applying penetrating epoxy then a varnish schedule.
I'm getting a little weeping, just enough to dampen the surround down below but not enough to drip.
Hoping to go for a sail Sunday, wife and kids are getting anxious.
May 13, 2015 at 12:34 pm #1195Fleet CaptainKeymasterKnow lots of folks who swear by butyl tape–particularly for hardware bedding. Has to be much neater than my “smear” technique.
May 18, 2015 at 1:19 am #1196SienaParticipantIn my new varnish craze I locked eyes on the companionway hatch/ladder. My top tread had a crack in it from being cantilevered out and if it wasn't fixed, it would have gotten worse. I was trying to figure out how to reinforce it. I have lots of metal around from aluminum to stainless plate and thought about putting in a plate from below. Really what I needed was to drive in a rod and epoxy it so the crack wouldn't get worse.
Fortunately at my work we have tons of brass rod so I grabbed a piece of 13/32″ brass rod and set about fixing. I was just going to do the top step then decided to just do them all for symmetry. My 4 year old son was helpful in holding a scale so I could drill a 4″ deep hole in a 3/4″ tread. Even though I consider myself very proficient with a drill, that was nerve wracking especially doing 8 of them. Chamfered one end, slathered in epoxy and my son manned the dead blow.

This was the top tread. The whole ladder was looking a little janky so I decided to just do it right.


I used my favorite Bosch jig saw with the tilting fence and cut off the brass rods flush. Then I carefully belt sanded the edge of the treads to take away some of the wear. I soaked the whole ladder in citrus stripper and then scraped it clean. I also did the plywood engine hatch as well.
I sanded the entire ladder down to 220 and gave it a sealer coat of Goldspar satin varnish. I like that stuff, it lays down great, very easy to get nice coats. I'll do 5 more and call it good. The ladder looks 10 times better even with just one coat.

Fortunately the rest of my interior is in excellent shape. It has 10 coats of new varnish on the sole and the remaining interior I either did in satin or is in good shape. The only parts that need a little help are the handles and some surrounding trim in the companionway. But that can get done this summer, I need to get out sailing!
May 28, 2015 at 1:09 am #1197SienaParticipantI finally test drove one of my new improvements this evening. I removed the fluorescent light fixture above the ice box. I purchased a 5m string of LED light strip and installed a 5' section in the galley. It runs under the deck from the main bulkhead above the ice box, over the range and sink area. Wow. Just wow. I will take pics but let me just say it really puts out a beautiful spread of light right where you want it in the galley.
Couple notes.
I bought the 5050 LEDs which are the brighter version, about $15
You can cut them every 3 LEDS and there are solder points there to attach new wires.
I bought the warm white version which has a nice yellow tone just like incandescent bulbs
I installed a small round rocker switch in the aft galley cabinet just to the left of the stoveWhen I had them in the garage out of the packaging I hooked up the entire string to a spare battery and used my DVM to check the draw. The 5 meter length drew 3.2A. So guessing my 5' section draws about 1A.
I also replaced all the overhead lights with LED bulbs as well as the reading lights. One of the old bulbs I checked drew 1A, the new LED lights were 0.15A and considerably brighter. I also used warm white bulbs here.
Overall the total cost for retrofitting LED bulbs was way less than $100 and I cut my Ah usage substantially and got a lot more light. I wish I got a before and after but I can tell its drastically different
These were the bulbs I used for overhead lights
http://www.ebay.com/itm/131379602658?_trksid=p2057872.m2749.l2649&ssPageName=STRK%3AMEBIDX%3AIT
Reading lights
http://www.ebay.com/itm/251525795319?_trksid=p2057872.m2749.l2649&ssPageName=STRK%3AMEBIDX%3AIT
Led light strip
http://www.amazon.com/gp/product/B00JMEIZB6/ref=oh_aui_detailpage_o04_s01?ie=UTF8&psc=1
-
AuthorPosts


- You must be logged in to reply to this topic.